Thursday 30 April 2020

Halloween Mini Album Card


This post is a little out of season but following on from yesterday's blog post I wanted to show you my second example of a Mini Album Card. To find out all the details of how to make these please see my original Mini Album Card post which will list all the details.

The paper collection I used for this album is Simple Stories Say Cheese Halloween.
These papers were perfect for documenting our trip to Mickey's Not-So-Scary Halloween party in 2019.


For this example I decided to adhere the album to a 12x12 paper as I liked the look of this album open and I really wanted to use the fireworks paper in the background.


This Simple Stories paper collection also included a 12x12 sheet of stickers which were great to use as extra embellishment.


Similar to my previous mini album card, I also included the miniature accordion album in the top right corner. 


I used the space inside the accordion album to document all the sweet treats we ate whilst at the party!


Moving on to the miniature envelope...


Inside the envelope I included a couple more photos with a 2x2 quote card, a journaling card and a cut out skull embellishment.


Moving onto the pocket at the bottom of the album....


Inside the pocket I added some more photos with three tags. On each tag I included some of my 'favourites' from the party.


Finally I included some stitching detail around the die cut shapes to add some texture to the album...


I hope you enjoyed looking through my second Mini Album Card and for you Disney fans out there I definitely recommend any of the Simple Stories Say Cheese paper collections. 

As I said in my previous post, these albums are quite addictive to make.... so a third album could be coming to the blog soon! Watch this space!

Wednesday 29 April 2020

Mini Album Card - Inspired by Paige Evans


Today's scrapbooking project is inspired by the talented Paige Evans. If you haven't seen any of Paige's makes before then you are in for a treat. If you also happen to have a Silhouette die cutting machine then you will definitely want to check out all of Paige Evans cut files on the Silhouette Design Store because they are perfect for scrapbookers and paper crafters!

To view how to make this album using Paige's cut file please see the following video:-


It is possible to make this mini album card by hand using a paper trimmer and scoreboard. You can then add any die cut shapes by running the album through your die cutting machine.

For this album I wanted to document my 30th birthday tea party and chose some floral papers that would work perfectly for this theme.

The papers I used were from Carta Bella's Farmhouse Market Collection.


I decided to use this type of album to scrapbook these photos because I just love all the little details. There is a section in the top right that folds out like an accordion album, a cute little envelope in the middle and a pocket towards the bottom left. Each of these elements allows you to add extra photos and journaling so that I could capture the day in one album,


I used both the front and back of the mini accordion album to include photos of my guests and also included excerpts from my speech about how I knew my guests and why I wanted them to celebrate with me on my birthday.


I used the mini envelope to include some more photos and excerpts from my speech. I used a Heidi Swapp stamp (Magnolia Jane Only You 313671) set to include some floral embellishment to the front.


I printed my journaling on some plain Bazzill cardstock that co-ordinated with the Carta Bella Farmhouse Market paper collection. The journaling cards measured 2" x 2", the same size as my photos.


The pocket at the bottom of the album also included some more photos of my guests, along with some tags and journaling cards.


Some other little details that I included was some back stitching around the die cut shapes and across the banners.


The clever thing that I love about this album is how the whole thing can fold flat (like a card!!) which means you can easily make this for someone and send it to them in the post.
To complete my album I just used some natural coloured ribbon to wrap round the album and tie a bow. 


Now I must warn you that once you have made one of these albums they do become quite addictive as I have already completed my second album and am looking at making a third!

For my second album I documented our day at Mickey's Not-So-Scary Halloween party and instead of folding the album up, I decided to keep it flat and use it as a scrapbook page layout....

More details about that design in our next post....stay tuned!


Tuesday 28 April 2020

Mini Vintage Scrapbook Album


Today's project is a blast from the past as we initially hosted a workshop on making these Vintage Scrapbook albums back in 2011, which you can read about here. The albums we made at the workshop were bigger than this miniature album, enabling you to add 6" x 4" photos to it.

I made this album after we returned from a Cornwall trip back in 2012 and I just love how easy these albums are to make.

Now unfortunately the material that the cover is made out of; which is Tim Holtz Idea-ology Grungepaper; is in very low supply these days after it was discontinued. There are a few Ebay sellers who might still have this product so it's worth looking around. 

This Grungepaper is perfect for making an album look like it was made out of a leather like material.

To create the cover:- 
1. Cut some Grungepaper to the size you want. 

2. Use an embossing folder to create an embossed texture across the cover. 

3. Choose a colour of Tim Holtz Distress Spray Stains (my album was made with the original Distress Stains that you could rub onto a surface). Use a large paintbrush to brush the stain onto the cover. Leave to dry.

4. Use a Tim Holtz Distress Ink Pad, either in the same colour as the stain or maybe choose a vintage colour, such as Vintage Photo or Walnut Stain. Lightly add some more intense colour across the album cover using a blending tool.


Inside the cover I attached a concertina album. I used plain cardstock to make the album and used Tim Holtz Distress ink pads and a variety of stamps around the edge of each album page to create a nice background for my photos.


I chose to add a black and white tint to my photos before I printed them and then added touches of Tim Holtz distress ink to areas of the photos.


Before I stuck my photos down I used pieces of old lace to place around the corners and along the edges of my photos.


I also used bits of washi tape behind some of my photos to add a bit of extra design to the background.


I added a pocket to the back of my album using a small piece of Grungepaper that I had decorated in the same way as the cover. I then created a tag and added a vintage stamp design to the front of it. This pocket is also ideal for putting bits of ephemera in.

I added photos to both the front and back of the concertina album and secured the album inside the cover using a mini stapler to hold in place on the inside of the front cover.

On the front cover I added a piece of washi tape and used a Dymo to create a title for my album and then secured in place using a mini stapler.

All in all this album is a lovely way to present your photos and you can make adjustments depending on the size you want. If you can't find any Grungepaper you may be able to use a very lightweight chipboard such as Silhouette America Chipboard to create your album.


Wednesday 15 April 2020

Pixelhobby UK Spring Blooms Card Kit


Hi everyone, today we want to share with you this fun card kit by Pixelhobby UK. In times like this we have found that all types of crafting can definitely help with mindfulness and we want to bring you some ideas that will help keep you occupied and are also fun at the same time!

These card kits from Pixelhobby UK can be found on Hochanda and are a wonderful way to pass the time. Not only can you enjoy the making process but you can also admire your work by framing it or use the included cards you get with the kit to send your wonderful piece of artwork to a friend or family member.


The specific kit that we bought from Hochanda was the Spring Blooms card kit but there are also many other card kits you can choose from. Alternatively set yourself a bigger challenge and purchase one of the larger sets to make a large picture which often includes a frame for you to display your finished artwork in.


It's so simple to get going and each kit includes everything you need to start creating!

Check out all 3 finished cards below...


Pixelhobby UK do also have their own website and even provide a bespoke image service so that they can turn one of your favourite photos into a piece of pixel art. 

So if you are struggling to find your next project check out Pixelhobby UK's range of products here.


Thursday 9 April 2020

Easter Crafting Inspiration: Treat Baskets


Today's Easter project is the last in our Easter Crafting Inspiration series and is a fab little project to create as little gifts for Easter. These Easter baskets were inspired by Graphic 45 who posted this project on their blog and also included a very simple 'how to' video which I will include below.


The original example by Graphic 45 made some baskets that were slightly bigger than mine, using 6x6 inch paper. I tweaked the measurements of my baskets by using paper that measures 4.5 x 4.5 inches.


Once I had made my baskets I found a flower cut file on the Silhouette Design Store (Lori Whitlock 3D Layered Flower - Design ID 25298). Alternatively if you have a die set at home that create flowers you can use this or maybe even use a pre-made flower.


I then created small banners on my laptop with a Happy Easter sentiment on. I then tied these round one of the handles on the basket using some twine.

To fill the baskets I took some pastel coloured paper and put it through my shredder. I then scrunched these pieces up and filled each basket. Alternatively you can also buy pre-shredded tissue paper.

We hope you have enjoyed our Easter Crafting Inspiration series and have been able to make a few of our projects or at least been inspired by these to create your own Easter makes.

We hope to be back over the next few weeks updating you on some other projects we have been making.

Stay home, stay safe and keep crafting!


Wednesday 8 April 2020

Easter Crafting Inspiration: Arthur Rabbit


If you love to knit then this Easter project is definitely for you! 
Arthur Rabbit is a knitting kit from a company called Sardines for Tea. The kit we got was originally bought from Hochanda but you can purchase direct from Sardines for Tea by visiting their Etsy shop here.


The kits are beautifully packaged in a brown paper bag and include everything you need to complete Arthur Rabbit including his scarf and coat! All you need to add is your own needles.


To complete this project you will need to know the following knitting techniques:-
You will need to be able to cast on and off, knit, purl, knit stitches together, make one stitch, knit through the back loop and sew seams.

Not quite the knitter but know someone who is? Buy this kit as a gift for them or they might be so kind as to make it for you!

Tuesday 7 April 2020

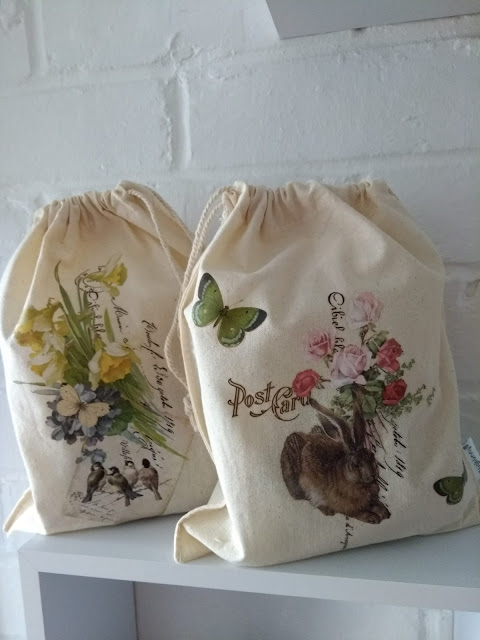
Easter Crafting Inspiration: Canvas Gift Bags


We are kick starting the week with another inspirational Easter crafting project. We have two more Easter posts to share with you this week to complete the series and we do hope that you have found at least one project to inspire you to create for Easter.

Today's project are these wonderful canvas gift bags that are very simple to make. We used heat transfer sheets from LaBlanche to iron onto some small canvas bags. We have included links below to the different heat transfer designs on LaBlanche website.

Let's start with a few close ups of each of the designs.


Materials Used:
Cotton Drawstring Bags - these can be sourced from Amazon or Ebay

Additional Supplies:
Iron
Heat Resistant Board

How to Make:

1. Preheat your iron for cotton textiles and deactivate the steam.

2. Choose the design you want to use from the sheet and roughly cut around it with some scissors.

3. Place the cotton bag on a heat resistant board and give it a quick iron to make sure it is wrinkle free and preheated.

4. Place the iron on motif on the fabric and cover with the parchment paper that is included in the packaging. Place the iron on top for 40 - 60 seconds and always keep the iron moving and do not let it rest on the motif.

5. After ironing the motif, leave to cool for a few minutes. Begin to pull the film from the corner of the motif. If the design has not completely transferred, place the parchment on top of the motif again and iron for a further 20 seconds.

The technique can be a bit fiddly in terms of getting the pressure and timing correct but once you ave done a few you get use to a method that works for you.

Gather some Easter treats and put them inside the bags for additional gifts this Easter!

Friday 3 April 2020

Easter Crafting Inspiration: Teacup Scene


Today's project is for the Vintage lovers out there as this is a wonderful piece of vintage home decor that will have family and friends in awe of your creativity!

Similar to the Easter Scene Jar you can have fun with this project and keep adding different elements that you might already have in your craft stash. Make sure you have your glue gun to hand as you want to make sure you stick everything down firmly so nothing moves around and falls out!


Materials Used:

Vintage Teacup and Saucer 
Wooden Bunnies (sold out at Hobbycraft, search Google for other sellers)
Faux Blossom Garland
Mini Speckled Eggs
Scrap pieces of patterned Fabric

Additional Supplies:
Glue Gun

How to Make:

1. Decide what angle you want your teacup to sit at on your saucer and continue to work with the teacup at that angle.

2. Glue a wooden bunny to the bottom of your teacup.

3. Create a small circular shape with the blossom garland and place around the bunny. Glue in place with a glue gun. 

4. Add some moss around the bottom of your scene.

5. Add some flowers and miniature eggs to your scene, gluing them in place as you go.

6. Cut out some triangular banner shapes from your scraps of fabric.

7. Attach the banner pieces to some twine and tie a bow at each end. Attach the bunting to the top of your teacup scene.

8. Once you are happy with your finished Easter scene, glue the cup to the saucer using the glue gun.

These teacups make a great alternative gift to an Easter egg and is something that you can enjoy year after year!