Saturday, 29 May 2021

Wedding Series 2: Starfish Buttonholes


To co-ordinate with my beach theme bouquet, we needed to create some buttonholes that reflected the same theme. From ideas I had seen on Pinterest, I knew I wanted the main feature to be a starfish with some decoration included behind.

We used the same starfish from the bouquet which were sourced from Amazon. We also got the buttonhole backs from Amazon - these were actually leftover from my sister's wedding, back in 2015.

We used some ribbon to wrap around the buttonhole back and this was dyed with Tim Holtz Alcohol ink in Tranquil so that it matched the same blue in my bouquet.

We used the same beading that was used in my bouquet, which had also been dyed with the same alcohol ink. We then finished off the buttonhole by including a shell at the top, which was from our own stash.


I think these buttonholes matched in brilliantly with my bouquet and made the perfect groomsmen accessory for the wedding. Of course we made enough for the men in the family, so everyone co-ordinated with the theme (apart from Eddy the dog)!

Monday, 24 May 2021

Wedding Series 2: Beach Bouquets


Next up in our wedding series are the beautiful bouquets. Since our wedding is themed around the beach/seaside, I wanted to incorporate a beach theme into my bouquet. Also as a crafter I knew that I wanted my bouquet to be made from artificial flowers/fabric, rather than having real flowers. This way I get to keep my bouquet forever and it allows me to get very creative!

Mum took the lead in making these for me as she also made the bouquets for my sister's wedding back in 2015 (click here to read that post). We decided to incorporate some of the same style of fabric flower in my bouquet as well, but aside from that, we needed to find different types of flowers that would work well with the theme. I also wanted to include some shells and starfish in the bouquet to elaborate on the beach theme.


We sourced nearly everything from online retailers (mainly due to UK lockdown) and played around with quite a few options before things started to click into place.

We got the bouquet holders from eBay - but you can get the same ones from Floracraft, which is a US retailer. Unfortunately the ones we got from eBay still needed to be shipped from the US but they arrived quite quickly. These bouquet holders were the prettiest ones we could find and they feature a beautiful clear plastic handle that looks like fine crystal - much nicer than a white plastic handle. Also the size of these were larger than others we found in the UK.

The large blue flowers on the bouquet came from a flower arrangement we found on Amazon. Unfortunately we couldn't use some of the other flowers that were included in this arrangement as they were too large.

The blue beading we included was sourced from eBay. This came as cream coloured pearls but we managed to colour them using some Tim Holtz Alcohol Ink Pearls in the colour Tranquil.


You may also be ale to see in the picture above that we included pieces of artificial reef. This helped to expand on the beach theme and once again we coloured this in the same blue alcohol ink so it matched in with the colour scheme in the bouquet. We sourced these from Amazon and they are normally used for fish tank decorations - however they make the perfect decoration to use in beach bouquets.

The small starfish that we used came from Amazon as well and the shells we used were from a collection of shells that we already had at home.


For the base of the bouquet we wrapped around some seam binding ribbon in a cream colour. We also included a shell locket that had two pictures of my dad in. This is such a beautiful way to incorporate loved ones that are no longer with us and kept him close to me on my wedding day. 


The shell locket came in a gold brass colour which we turned shabby chic by dabbing on some cream coloured paint.


For my sister's bouquet, we included most of the same elements, however since she had some pink in her dress, we decided to add some pink flowers to her bouquet.


I think the bouquet complimented my sister's dress perfectly!

These bouquets turned out exactly how I imagined they would and they make great floral decorations that I can display around the house! 

Stay tuned for our next blog post in this Wedding Series which will feature our handmade Starfish Buttonholes.

Tuesday, 18 May 2021

Wedding Series 2: Invitations


Next up in our Wedding Series we are featuring the main Wedding invitations and these definitely are the star of the show!

Once I had created my Save The Dates, I had set the scene for a seaside/beach wedding theme and I started brainstorming ideas. As a crafter, creating my own wedding invitations was a must and it has been something that I have been looking forward to my whole crafting life. However with the challenge set out in front of me, it became quite a daunting task and I knew I wanted to impress - therefore adding extra pressure.

I had thought up quite a few ideas, but nothing seemed to be ticking all the boxes. Until one day I was searching on eBay and the perfect die cut appeared and I knew there and then that this was exactly what I was looking for. Now I never ever buy my metal dies from China (through eBay sellers) - however I had searched all other die cutting brands and companies and nobody had what I was looking for. As you may be able to see from the design below, the edging die I used to create the fold over flaps was the perfect design to incorporate the shells and the starfish that I needed for my seaside/beach theme. 


Once I had the edging die cut, I was able to create the main insert for the invitations. I designed this on the computer using a combination of fonts to create the desired look that I wanted.

I also created a band for the main part of the invitation to keep it altogether. For this, I used a piece of gold card (the same card I used to die cut the edges) and then I added a die cut shell. This is from the Tim Holtz  Seashells Bigz Die with Texture Fades. I edged the shell using a dauber sponge and a gold metallic watercolour paint.


If you have previously read my post about designing invitations during a pandemic, you will know the dilemmas I faced when it came to including all the necessary information for our guests. We decided to include a introductory letter to our guests that addressed the issue of Coronavirus and how we would stay in contact with them as the situation changed. We also included a brief outline of what the menu would entail, as well as accommodation information and a little poem about what we would like as a wedding gift. All that was left was to include an RSVP that our guests could fill out and return in the post.


To decorate these pieces of wedding stationery, I used the same starfish and sand dollar stamps that I used for the Save the Dates and also the same technique of embossing the designs with gold embossing powder.


I am so chuffed with the end result, which perfectly captures the design I wanted to create - a beach themed invitation with a touch of elegance! I am hoping to include this design in my Etsy store in the future, so watch this space...


Thursday, 13 May 2021

Wedding Series 2: Save The Dates


Welcome to the start of a new Wedding Series on the blog, where we will be sharing some inspiration on lots of different wedding makes, including invitations, buttonholes, bouquets, table decorations, favours and more! This series will be split into two parts, with some posts in May and then the rest will be in November (after our wedding party - don't want to give away too many sneak peeks!) If you haven't already read our first Wedding Series on the blog, then make sure you check it out here. In the first series, I recapped a lot of wedding makes we created for my sister's wedding back in 2015.

So let's kick start this series with the Save The Dates...


So before I even got to the designing phase, I needed to come up with a theme for our wedding. The Save the Dates are an introduction to your wedding for your guests and are also a sneak peek into what the theme will be. We decided for our wedding that we wanted a beach/seaside theme which gave me plenty of scope to play with!

I often start researching ideas by looking on Pinterest and Etsy to see what kind of things I could come up with. We liked the idea of giving our guests something like a magnet or a badge that they could put up somewhere to remind them to "save the date".


In the end we decided to go for a magnet that our guests could put on their fridge (or anything magnetic). I played around with a few different ways of creating the magnet but in the end I ordered some clear plastic badges from Amazon and then simply took off the pin at the back and stuck a disc magnet on the back. The clear badges allow you to put your own design inside, so I therefore designed the text of the badge on the computer and cut them out using my Silhouette die cutting machine. I left enough room between "Tying the Knot" and the date at the bottom so that I could add a stamped image of a rope. I stamped this using a clear embossing ink and then used some gold embossing powder.


I designed the backing card in a similar way, by designing the text on the computer and then once printed out I added some stamped starfish and sand dollar designs to the top of the card and embossed them. Once they were all complete, I just used a small sticky dot on the back of the magnet to adhere to the card.


 Stay tuned this month for more wedding inspiration in this series, including invitations, bouquets and buttonholes...

Friday, 30 April 2021

We're Hitched!


After months of planning and agonising over whether our big day will actually go ahead, we can finally shout from the rooftops that we are hitched! 

Announcing Mr and Mrs Tilley!

It may not have been quite the wedding day we had originally planned but it turned out magical in the end and a lovely celebration spent with those closest to us! A huge thank you to everyone who supported us in our decision to go ahead rather than postpone any longer. Also massive thank yous to my mum and sister for all their hard work leading up to the big day and making sure it felt special.

We can't wait to share some of the creative makes involved in the wedding, so stay tuned next month for the start of a new Wedding Series on the blog...

Monday, 26 April 2021

Craft Room Reveal


I am finally excited to reveal my new craft room, and it has been a long time in the making! Since me and Conor moved into our house in 2018, I knew I wanted to convert the smallest bedroom into a craft room/ office for me. With other areas of the house needing to be prioritised first, this room had to sit on the back bench until we had the time and the money to invest in it. This room wasn't in the best condition when we moved in and the room also had a stairs bulkhead that we needed to get converted to maximise space in the room.

I have included a couple of before photos below...


The walls were in poor condition when we moved in and the skirting boards were very high and coming away from the wall. Therefore we needed to take those off and get the room replastered.

Once we had taken down the majority of the cupboard from the stairs bulkhead, we were left with a basic bulkhead structure that needed to be covered up and made into something useful.


I decided that building a cupboard over the top of the bulkhead will be the most practical solution so that I could store a lot of craft/office supplies. For this job we needed to find a local carpentry company - unfortunately the company we chose were not the best and we did have quite a few problems along the way. 


However we did finally get a cupboard that had the look of what I had initially planned...


As you can see, the cupboard fills the entire space up to the ceiling to maximise the total storage space I could achieve in this area. 


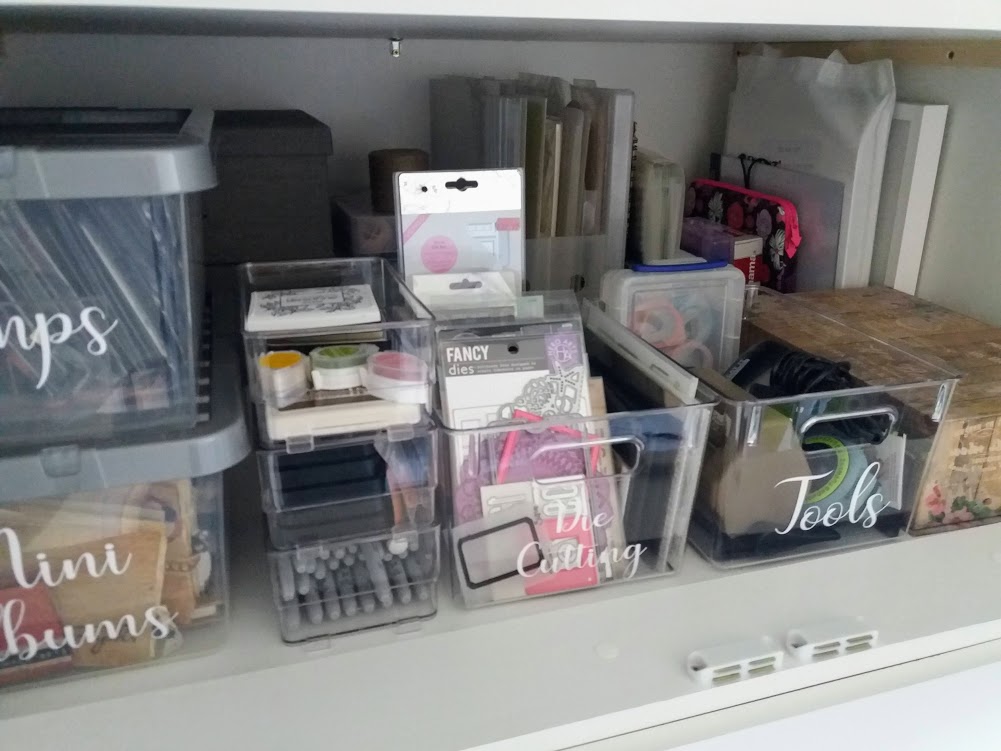
There are three shelves inside the cupboard which are very deep and enables me to double up on storage space. As you can see from the picture above I have started to organise my supplies and used my Silhouette die cutting machine and some vinyl to label the boxes.

Product Links:


The doors are very wide which gives me plenty of room to manoeuvre boxes in and out of the cupboard and they have a magnetic catch on the doors for easy opening and closing.


Alongside the cupboard, we also had new skirting boards fitted in the room as well. Once this cupboard was complete we were able to give the room a fresh coat of paint and then got some new carpet fitted as well to freshen it up.

So moving onto the rest of the room...


As you can see from above, the room is fairly small and the cupboard we had built is on the left as you walk into the room, situated behind the door. On the right hand side I have a couple of storage units and a table.


The tall unit is an Ikea Kallax unit. Initially I thought I wanted to put this unit on the wall above my desk but once built, this unit is very heavy and therefore it would have been too difficult to mount on the wall. I'm using this unit to store my Project Life albums and also extra albums and notebooks. I also have some 12x12 plastic storage for my scrapbooking papers and plain 12x12 card stock. There is also a shredder at the bottom of the unit.

Alongside the Ikea Kallax unit, I have another storage shelf and drawer unit which I bought off Amazon.


This unit was a great find and as soon as I saw it I knew it would be perfect for storing my craft machines. I have my Silhouette die cutting machine on the top of the unit, followed by two printers underneath (one laser, one inkjet). I then have my Heidi Swapp Minc machine and I have some CDs stored at the bottom - these will likely move if I get any new machines! These are all plugged in on an extension lead so that I can easily use these machines in situ. The drawers next to the shelves have some Silhouette and Minc accessories.

Product Links:


Next to these units I have a desk which I have set up with a ring LED light for taking pictures and also my laptop which features my Craft Artist design software. The wall is very plain at the moment but I hope to jazz this up with either some art work or decorations - maybe paper fans.


On the other side of the room (next to the cupboard) I have my main desk which I keep my essential tools on and die cutting machine. I have some Ikea peg boards on the wall just above my desk which keeps my paper trimmers and scoring board handy, as well as some kitchen roll, ruler and scissors. When I next go to Ikea I want to pick up some more peg board accessories and add a few extra bits.

Above the peg boards I have two shelves which I am using to display some of the projects I have made and also some photos and journals.

Product Links:


On the side of my cupboard, next to my desk, I have stuck a wipe clean calendar, which I can change very easily and keep track of what I am doing each month. Below the calendar is a magnetic board which I am using to display my favourite photos and some keyrings. I can also pin up anything that inspires me or any reminders I need to keep close to hand.


So that sums up my craft room reveal. I have included links throughout the blog post to any of the items I bought and are currently still available. The one thing I am still in need of is an Ikea Alex drawer unit which they have just recently got back in stock. So once we take another trip to Ikea I will update the room with that for storage of my inks, pens, paints, adhesives and more! The other finishing touch is to install some venetian blinds as I currently have no curtains!

Saturday, 17 April 2021

Card-io Fun


If you've just tuned into this blog post hoping to find a piece about cardio fitness fun then I'm afraid you are mistaken. As much as I find cardio exercise fun, I would rather talk about the stamp making craft company called Card-io!

Last weekend we had a morning of crafting and chose to experiment with some new Card-io stamp sets that mum had ordered from The Craft Store ( Hochanda - must prefer this name!). The sets of stamps we used are as follows:-


These stamp sets (apart from Still Waters) come in a bundle called the Riverside collection if you fancy having a go at creating some beautiful stamped scenes.
We also used a selection of VersaColor ink pads, as well as some dew drop ink pads including Brilliance, Memento and VersaMagic.

This Card-io session didn't really have a real purpose, other than mainly to have some fun and experiment with techniques and stamps. If you've ever watched a Card-io demonstration on the TV or at a trade show, you will know how talented Wendy is when it comes to demonstrating the application of colour and also her beautiful compositions. To make things easy for ourselves we started off by using some design inspiration from their Facebook page and also rewatched their shows on The Craft Store (Hochanda) to pick up some tips and techniques.


To start with, I used a piece of paper to create a hills border and used some reposition-able adhesive to keep this in place. Using a dry wet wipe, I carefully started adding some yellow ink to create a sunny glow and then went in with my first stamp to create a branch arch.


As you can see from above I used a range of stamps and colours to add some foliage and flowers. I then added the mice and the birds to bring the scene to life.

Mum also experimented with a branch arch scene and used some beautiful blue tones to create a lovely background, before building her scene using brown ink with her stamps.


For my next design, I created another hills border that was a slightly different shape to the previous design and added some green ink for the grass as my background.


I then used a selection of the stamps to add some greenery and flowers and brought the scene to life with the fox and the birds. 


For the fox, I layered a combination of three brown inks to create a shading effect.


We also used this effect to create a different design using the otter stamp.


We finished by having a play with some of the smaller floral stamp sets to create some border designs.


So that sums up our little play around with Card-io stamps. It was lovely to just sit down and craft without any real purpose to what we were making. We just sat down and got everything out (there was a lot!!!) and  then created whatever we felt like. It did take us a while to get going but once we had got into the swing of things and started to pick up a technique, it became quite therapeutic.

We highly recommend Card-io stamps and we definitely suggest watching Wendy at a trade show or when she is next on the TV as you will definitely pick up some great techniques and some handy hints and tips.