Tuesday 24 September 2019

REWIND SERIES: Craft Jumble Sale Beginnings


Our Rewind Series on the blog has now reached 2018 and it was at the start of this year that I had an idea that would help bring the crafting community together in our local area in Crawley and West Sussex.

Our craft room at home was getting rather crowded and there were drawers and boxes of craft items that we just neither used or wanted anymore. Car Boot Sales didn't gain much attention from non-crafters and Ebay just felt too long winded to sell our unwanted craft items. At this point I had a lightbulb moment........why not start a local craft sale for unwanted craft products.

I knew of one other sale located in Burgess Hill, however this sale was only limited to once a year in May and with all the items we had gathered up, we just couldn't wait that long. I made some enquiries at our local hall in Three Bridges..... The Montefiore Institute Hall....and then planning was in motion.

Our first Craft Jumble Sale took place in March 2018 and was met with great enthusiasm and encouragement. Visitors came from around the area and once crafters knew there were some bargains to be had they couldn't wait to get stuck in and find them amongst our stallholders. Unwanted craft items our stallholders were selling included paper crafting, knitting, sewing, jewellery making, kids crafts, cake making and more!


The success of our first Craft Jumble Sale was overwhelming and requests were piling in from stallholders and visitors for us to host another sale. Therefore we decided to host another one in September 2018. Popularity for this event grew even more and September's sale saw queues outside the venue as eager visitors awaited for the sale to start. By the end of our 2nd Craft Jumble Sale attendance numbers were getting too big for this small hall and so we were on the hunt for a new venue in town.


At the start of 2019 we started planning our next Craft Jumble Sale for March and found a new venue - St. Barnabas Church Hall in Pound Hill.
The hall enabled more stallholders to sell their craft stash and also allowed visitors to walk around the event more easily.


Our most up to date sale was a week ago on 14th September 2019. Once again the sale was a huge success and my list continues to grow for new stallholders and visitors who want to attend the event.

Interested in selling?

If you have any unwanted craft items that you want to sell, including papercrafting, knitting, haberdashery, jewellery making, kids crafts, cake making etc. then please do not hesitate to contact us at craftjumblesale@hotmail.com.

Our next sale will hopefully take place in March 2020.

You can also like and follow our page on Facebook by clicking here.

Saturday 21 September 2019

REWIND SERIES: Mini Mason Jar Photo Holder Workshop


Our second Christmas workshop in 2017 was a smaller project and I think this one is incredibly cute! This mini mason jar photo holder workshop was inspired by Mr Tim Holtz after seeing what he had created using these jars and they are a fantastic idea for gifts for friends and family!

Once again I don't have any photos from the workshop but I have some close up photos to share with you and I'll talk you through how we made it.

So we started with Tim Holtz Mini Mason jars and one of Tim's Photo Clip Tool Sets. This set includes a lid (with a pre-drilled hole), screw, wing nut, washer and hinge clip. All these pieces put together will let you change your mini mason jar into a photo holder.


For the inside of the jar we used one of Tim Holtz large woodland trees and added some glitter and multicoloured beads. We glued the tree in position at the bottom of the jar and then finished it off by adding some glittery snow.


We painted the lid using Tim Holtz Distress paint and also coated the lid (once dried) with Tim Holtz Distress Micro glaze. This helps give the lid a lovely smooth finish and provides extra protection from scratches. We finished off the lid by adding some twine and a snowflake charm.


The final detail to add was a photo. I sized my photo on the computer in the style of an Instax photo and then printed it in black and white. I then used my Dymo to add a Christmas sentiment.

This project is a fantastic idea that you can use all year round...... Valentine's Day, Easter, Halloween.....possibilities are endless.

Both the Mini Mason jars and Photo Clip Tool sets include enough to make 3 photo holders which is great value for money!

Sunday 15 September 2019

REWIND SERIES: Christmas Configuration Book Workshop


We are nearing the end of 2017 in our Rewind Series so that means Christmas inspiration is in full swing.
Christmas Configuration Book has got to be one of my favourite Christmas workshops and I will say from the very beginning that this project was inspired by the amazing Richele Christensen who designed this project for a class she was teaching in the US (very envious!!).
As soon as we saw this we knew we had to recreate it for a workshop. Even though this is one of my favourite projects, it was also the hardest and most time consuming project to put together. We spent many a late night leading up to the workshop getting everything prepped and finished in time!

But was it worth it..........YES!!!!!!

Unfortunately I didn't take many photos from the day or of everyone's final creation but I do have some close up shots of the configuration book we made and will provide a brief description of what we included.

As you may have guessed we had a full house for this workshop so wanted to make sure everything was prepped and materials in easy reach for our guests.


And of course one of the joys of a Christmas workshop is all the food......


Anyway back to the project.....


For the inside and outside of the book we used Simple Stories Christmas papers. On the left side of the book we used Tim Holtz Christmas Quote Chips to create a tree shape. We edged each chipboard quote with some red distress ink and used a Tim Holtz Wood Slice for the base and then die cut a star from glittered card to add to the top of the tree.


On the right side of the book, we used a massive assortment of embellishments to create a wonderful mix of Christmas loveliness.
Starting at the top of the book we used some of Tim Holtz Woodland trees and decorated these with some glitter, pearl baubles and a Tim Holtz Adornment Star. To create the house we used the Nellie Snellen House 1 die and added some Tim Holtz Platinum Glitter to the roof.

The next configuration cube on the right was filled with Tim Holtz Decorative Deer covered in Tim Holtz Platinum glitter.


Moving down the right side of the book we included two cubes that we inserted back to front and used a piece of ephemera from the Tim Holtz Christmas epeherma pack and layered these on the cubes. In the middle of the book we filled a cube with a miniature glass bottle (filled with snow) and added some die cut christmas foliage with some christmas berries.


The final block of the book has got to be the most magical. For this we used one of the Tim Holtz Vignette Box Tops to fit inside this section. We photocopied a vintage christmas postcard and used this as the background to the scene. We then used Brenda Walton's Sizzlits Decorative Strip Die: Woodland Deer to create the foreground of the scene. The deer and trees were coloured using distress inks. The final item we added were some tiny LED string lights to fill this section and we threaded this through to the back of the book so our guests could easily turn them on and off on the battery pack.


The front of the book was simply decorated using Simple Stories paper and then we created our own cabinet card using red card and die cut an oval shape at the front to leave space for our guests to add a photo. A final touch with a Christmas Quote chip and whoalah.......the project is complete!
Phew.......so much to fit into one workshop.....but everyone managed it and they now have a christmas decoration they can treasure and bring out year after year!

Monday 9 September 2019

NEW WORKSHOP: Holiday Memories


Our first Christmas workshop has arrived and it will be taking place nice and early this year so we have plenty of time to fit in another workshop at a later date!

Holiday Memories is a wonderful project, where you will be making a Christmas shadowbox frame, filling it with an adorable Christmas scene, some twinkling lights and a photo of your choice.

Now this post is a little different today as I usually give you a more in depth look at the project and explain the different elements. However this post will be short and sweet today as the project you will be making is going to look a bit different to the image above. We are still collating bits and pieces for this project and have provided you with an example that we are using as inspiration.

When I visited New York last year I bought this frame from a Michaels store and knew instantly that I wanted to recreate this as a project in the future. So the image you see above is of that very frame, but we are going to be tweaking the design and adding some additional features.

For more information about the workshop please check out our Workshops page.

Thursday 5 September 2019

Memory Village Workshop Recap


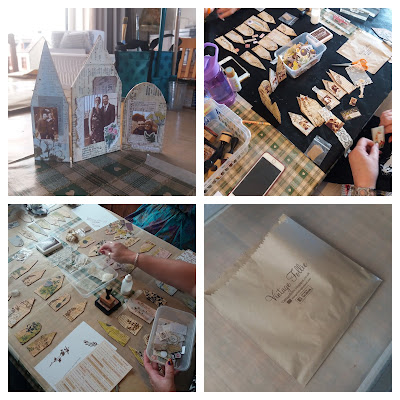
Last weekend we held our latest workshop called 'Memory Village' and I have to say that the atmosphere was definitely buzzing by the end of the day and our guests went home with some fabulous creations. 

This project is fun and simple to make and when it came to assembling the houses together, everyone brought their patience to the table and carefully joined them without any casualties!

As usual we prepped kits for our guests to get stuck into and set up the tables so they had all the tools to hand.


To get started, our guests had to choose from two different designs of tissue paper. Both had a typography design which made a perfect background for these houses.


Once all the houses had been covered with tissue paper, it was time to add a little distress ink, some paint and a variety of stamped designs.


Once they were happy with their backgrounds it was time to add embellishments and their photos. We gave everyone a variety of ephemera including Tim Holtz Botanical Layers and Tim Holtz Snippets ephemera. We also had scraps of lace to add some texture and some Tim Holtz Chit Chat words and Tim Holtz Clippings so they could attach an appropriate sentiment or phrase to each house.


The final stage of the project was to join each house together. To do this we included some pre-cut 'hinges' in their kit. The hinges were made from matte brown packing tape that I folded in half (so the sticky part of the tape stuck together) and then cut into 1" pieces. We used two pieces in-between each house.

So what did everyone create..........let's take a look....

Oceaniana

Zoe

Chris

Jill

Pauline

Some of our guests decided to add photos and/or extra embellishment after the workshop, but I couldn't help taking a photo of their fabulous backgrounds they had created....

Connie

Angela

Mags

Linda

Diana

Well I think you will agree that our guests did very well and made some excellent creations that they can all be proud of. We are definitely proud of what they all made and we love how at the end of the workshop everyone gathered together to see what each other had made. The room had a great buzz to it and we can't wait for the next one!