Friday 22 May 2020

Mindfulness Colouring


This week we wanted to share a small project on the blog to help mark Mental Health Awareness week. As we have mentioned many a time, creative hobbies can be a useful distraction from what is happening in the world around us. One of my favourite activities to do when I need some down time is to grab some of my favourite colouring books and connect with the artist within.

Rather than share with you the colouring books in my collection I wanted to find some online content that is free* for you to access and enjoy. On my search for colouring pages I came across these beautiful floral wreaths on Pinterest which led me to Imelda Green; an illustrator and graphic designer. She has her own website and features many free* printable images that you can download and print at home. 

*in return for accessing these free printables you need to subscribe to Imelda Green's email newsletter. Once you have signed up to receive her email newsletters, you will receive a password to access the Content Library. A small price to pay to have some beautiful illustrations delivered to your inbox!

Imelda Green also provides a free YouTube tutorial so you can follow how she has coloured in her design using watercolour paints.

I decided to use watercolour pencils and a water brush to colour these wreaths. The wreaths featured in this post are from March, April and May. If you fancy something more wintery, try the January and February wreath designs. If you intend to use watercolour paints/pencils, I do recommend printing on watercolour card if you can for a much smoother finish.

I started by using my watercolour pencils to add colour all around the wreath.


I then used my water brush to blend all the colours.


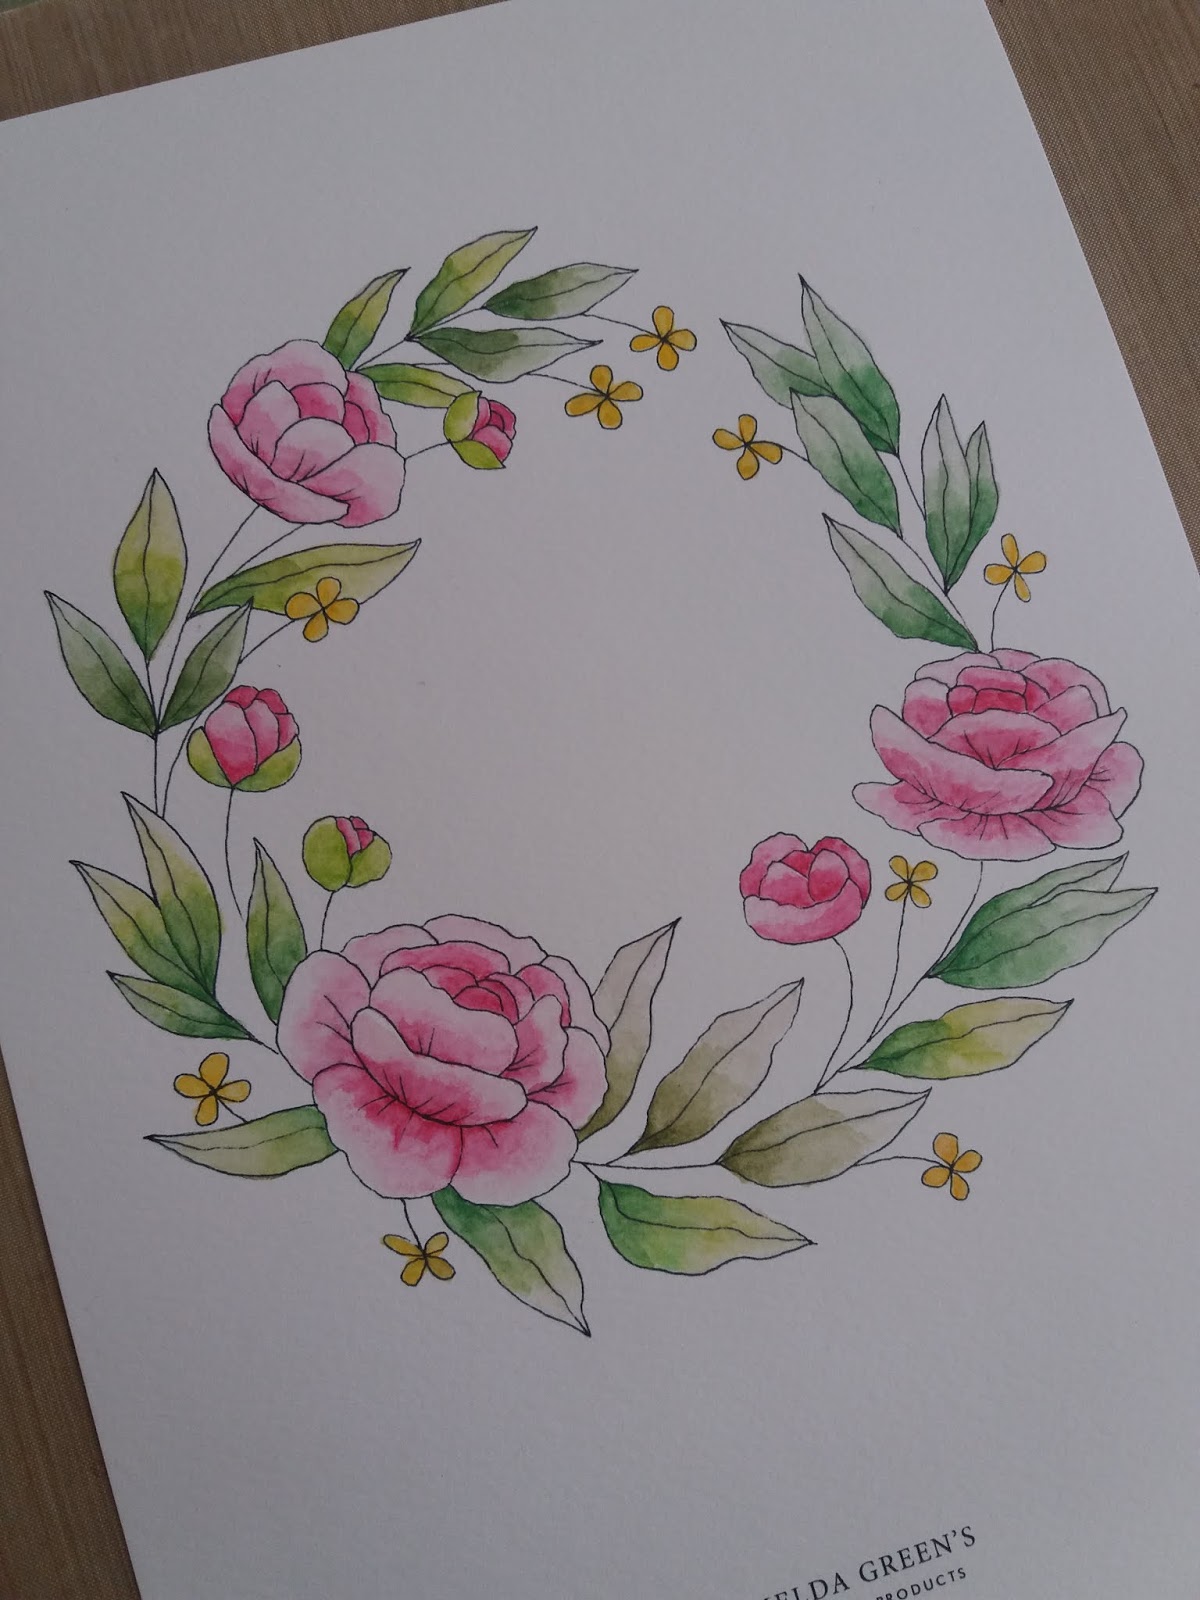
After I printed my first wreath in A4 size, I decided that these wreaths would make excellent card designs. Therefore I opened two other wreath designs into a blank document and resized them to make them smaller. I then added some text to the middle of the wreaths before printing.


These cards would make excellent letter writing cards, especially to send to friends and families now, or perhaps save your favourite to send to them on a special occasion. 

Imelda Green's features many other free printable images and I have already spied some Christmas tags and cards that I might have to download and try. Alongside these free printable, her blog also features some fantastic posts and you can also find some great tutorials on her website as well.

Thursday 7 May 2020

Doorstep Care Pod and Volunteer Pack Bags


We have a fantastic post for you today with these very useful bags that you can make. Today's post has been inspired by the website Spencer Ogg. This is a great website featuring lots of different bag designs and patterns which you can use to make yourself a whole variety of bags.

The bags we are sharing with you today may come in handy for yourself or potentially others in your community.

The Doorstep Care Pod is a really quick and simple bag pattern that can be used to fill with essentials for those who you know in your community that may be struggling or need to self isolate. Fill it with toiletries, prescriptions, groceries and more!


The bag features integral handles and a large box bottom to help the bag stand up and also provides enough room to potentially fit a small casserole dish. There is an option to add a weather resistant flap if you know you will need the contents of the bag to be protected or the bag will be on a doorstep for sometime.


Please find the Spencer Ogg tutorial below for full instructions on how to make this bag.


Moving onto the Volunteer Pack bags...


These volunteer pack bags are ideal for gifting to volunteers and key workers to carry their phone, keys, face masks, hand sanitiser and other essentials. Of course you can also make these bags for yourself as an easy and efficient way to keep all your supplies together so that you can simply grab this bag before heading out.


Inside our bag we have included a couple of fabric face masks, disposable gloves, tissues and some HBG Tape (excellent for holding your mask in place around the nose - especially if you wear glasses!)


On the pockets on the front of the bag we used this space to include some antibacterial wipes, some Instant Alcohol solution and also some filter inserts for our fabric masks.

This bag features a top zip fastening with an easy insertion method. As you can see from our example we decided to make this design more of a grab bag, making use of a short handle. However you can find instructions and links on Spencer Ogg's website for alternative handles you can add.


Please find the Spencer Ogg tutorial below for full instructions on how to make this bag.


We used a waterproof fabric for both of our bags to make them much more practical for carrying all different types of essentials. Please click here for fabric.

We think both of these bags are extremely useful during this time and will also continue to be handy to have around even once the pandemic is over. Spencer Ogg designed these patterns for the bags as a  distraction for us who are in need of a sewing project and what better way to enjoy your love of sewing then by also helping others at the same time. 

Wednesday 6 May 2020

Making Scrub Bags for the NHS


In recent weeks we have been responding to the call to arms to make scrub bags for the NHS. 

At times like these it is quite easy to feel helpless and wondering what part you can play to help. 
For any of you sewing enthusiasts out there there is an easy way you can get involved. The 'For the Love of Scrubs' charity have been calling out for help for an increase in a variety of items including scrub bags, face masks, scrubs, hats and more!

As well as showing you an example of the bags we have been making we also wanted to include some useful links to help anyone wanting to get involved.

If you live in the West Sussex area you can find out what is needed and also the patterns to make these items by visiting Sew In Brighton. They provide excellent links to patterns and also contacts for where your items are most needed. This page is updated weekly to provide you with the most up to date information.

Another great way of getting involved is Crafter's Companion Sew a Scrub Bag campaign. Sara Davies is encouraging anyone to get involved and has also provided a video tutorial and pattern for making your scrub bags. There is also details of where to send them to included on this page.
If you don't have many supplies then please take note of Crafter's Companion's newsletter incentive. When you sign up to receive email newsletters from them you can get sent a half a metre of fabric, which is enough for one scrub bag!

Ideally any cotton fabric will do as long as it can be washed at temperatures of 60 degrees. For our bags below we used a blue and white stripe piece of material which we managed to get 10 bags from.


It may feel like only a small contribution but it is something that is greatly appreciated by the NHS to give them the supplies they need.
So dust off that sewing machine and get involved!

Tuesday 5 May 2020

Make Your Own Fabric Face Masks

One of the projects we have been working on lately is making our own face masks. This design has been inspired by many different YouTube video and blog posts from other people who have also been making their own masks due to the Coronavirus outbreak.

DISCLAIMER: Theses masks will not stop you getting the virus but could act as a preventative measure to reduce the risk.

In this post we will take you through the steps of how we made them and will also include some YouTube videos below which are also easy to follow.


1. Cut your fabric to size, we recommend the following sizes for adults and children.
Adult Size: 16 x 8.5 inches
Child Size: 11 x 8 inches


2. Iron on light weight fusible stiffener (optional) and then fold lengthways and sew leaving about 4 inch gap for filter pocket.


3. Pre-neaten edges or top stitch.


4. Press fabric with an iron.


5. Add some elastic. We have used eighth of an inch flat elastic that we cut 6 inches in length. You may want to increase the length to 6.5 inches for men.


6. Pin elastic into folded and pressed edges.


7. Sew from corner to corner, back tacking to secure.


8. Turn to right side.


9. Press with an iron.


10. Insert an extra filter inside the pocket. This could be a folded paper towel, coffee filter or HEPA filter vacuum bag. It helps to add as an extra barrier to the outside air.

Fold the mask in half once the filter pocket is inside.


11. Open out and then press outside edges onto just pressed crease line.


12. Using creases as a guide, pleat, secure and then stitch in place on each side.


13. Press creases on both sides.


14. Cut a piece of pipe cleaner to 4 inches in length.


15. Use some pliers to bend each end to stop it from poking through the fabric.


16. Insert at the top of the mask.


17. Centre the pipe cleaner and then sew all the way round.


The pipe cleaner helps the mask to fit better over the nose to keep it in place.


Finished mask.

A few extra notes:

If making a mask for a child you may want to use ties to help keep the mask in place over the ears. You could use tape, ribbon or cotton jersey knitting ribbon. Insert in the same way as elastic and tuck inside whilst sewing, being careful not to catch it.

Elastic length for women: 6 inches
Elastic length for men: 6.5 inches

Please see the following YouTube videos below that we have found to be very useful when making these masks.


The next video is a very useful hack for simplifying the pleats in the mask.


We hope this blog post has helped anyone who is looking to make their own fabric face masks. 
We do recommend doing your own research to find a style of mask that might be most suitable for you and suitable for the environment you intend to wear it in.


Friday 1 May 2020

Mini Photo Fabric Collage


This is our last scrapbooking project we will be sharing with you this week and it is a gorgeous mini photo collage using scraps of fabric and lace to decorate around your photo.

You can use any style of photo for this project but we think a vintage or sepia tinted photo always works best.

For this project you will want some scrap pieces of fabric and lace, a photo that is approximately 1.5 x 2 inches and a piece of calico that measures approximately 3 inches square. You can obviously tweak your design dimensions if you want to make something bigger.

Instructions:

1. Once you have chosen your photo you can either;
(a) if it's an original photo we recommend photocopying it onto some photo paper.
(b) if it's a digital photo then add any tinting of your choice; e.g. sepia; and then crop it to size and print on photo paper.

2. Arrange scraps of fabric around the calico square and hold in place using a collage glue stick or sewing glue pen. We used a Sewline glue pen.

3. Arrange your photo on top of the fabric scraps and then start adding scraps of lace; again holding in place with a collage glue stick.


4. When you are happy with your design you can sew in place by hand or by using a sewing machine. We sewed around the edge and then again about .75 inches in making sure to catch the photo so this is held in place.


5. Display your collage in a photo frame of your choice.


These collages could also be put on a front of a card which is what we did in our Collage Card workshop back in February. You can check out our examples from that workshop here.

We found this project very easy to make and quite relaxing. Also the outlay is very small as you are using up old scraps of fabric and lace.

We hope you've enjoyed our scrapbooking inspiration week and hopefully it has inspired you to create something with your photos.